


3
Cabinet hinges are the unsung heroes of kitchen cabinetry. Every time you open and close the doors of the cabinets in your kitchen, it is these hinges that make sure the process is smooth and efficient. Installing cabinet hinges may seem like a daunting task, especially if this is your first time doing so.
But worry not, cause this blog will walk you through the steps of installing cabinet hinges. Read on to learn how to install traditional and European cabinet hinges easily.
Before we dive into the actual installation process, let’s take a look at how to prepare the cabinets and doors for the hinges. Here is a checklist of the steps you should take:
Whether you’re installing a traditional hinge or a European one, you are going to need some tools for the process. Here is a list of tools and items you should keep at hand while installing cabinet hinges:
Traditional cabinet hinges are usually used for decorative purposes. This is because a traditional hinge is mounted on top of the cabinet door and is visible (or partially visible) when the door is closed. These hinges are easier to install than European hinges, but they lack their versatility.
Here is a step-by-step guide of how to install traditional cabinet hinges:
Here is a video explaining how to install traditional cabinet hinges.
Use a pencil and tape measure to mark the areas of the door where you want to install the hinges. Once the marks are in place, lay down the hinges on those marks so they are flush against the inside and outside of the cabinet.
Make sure the space between the two (or three) hinges placed on the cabinet and the distance between the hinges and the edge of the cabinet is even. This step is crucial in ensuring the proper functioning of your cabinet door. Make sure to write the measurements down so you can replicate them for other similar doors.
Use painter’s tape to tape the top end of the hinges so they stay wrapped around the edge of the cabinet as you attach the screws.
Use a power drill to install screws to the cabinet-side of the hinge. Make sure the screws go all the way into the door.
Now flip the door side of the hinge on top of the screwed-in cabinet side and add a line of hot glue on the top. Place the cabinet door on top of the screw, adjust to align the door, and then keep it in place till the glue dries.
Open the door and power drill screws into the door-side of the hinge. Open and close the door a few times to check its alignment, and you’re done.
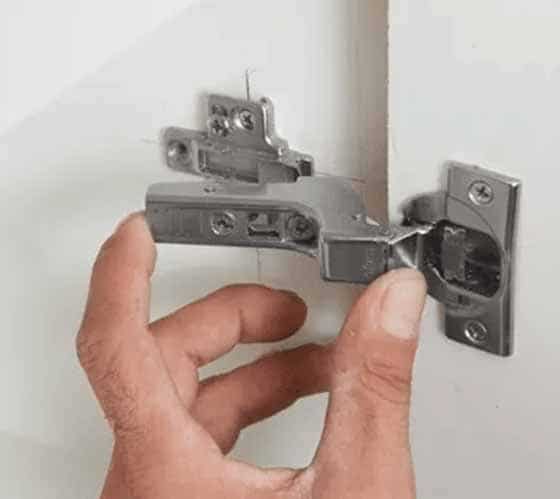
European or hidden cabinet hinges are a lot more common in the market. They are also a little more tricky to install. Here is a step by step guide to making it easier for you to install European cabinet hinges.
Here is a step-by-step guide of how to install traditional cabinet hinges:
Here is a video explaining how to install European cabinet hinges.
Mark the place on the door where the hinge cup will be installed by using a combination square to make a horizontal line that is 3.5 inches away from the top and bottom edge of the door. Make sure the line is inset ⅞ inch from the edge of the door.
Place your hinge on one edge of the line you drew and adjust it to make sure you are installing the hinge at the right position. Use a pencil to mark around the hinge. Then attach the 35-millimeter Forstner bit to your drill, position it so that it is on the center of the mark you just made, and bore into the door. Drill all remaining cup holes the same way.
Hinge cups are the convex part of the concealed hinge that goes inside the bored holes you just made on the door. Fit the hinge cups into the hole so that the screwholes of the hinge are flush with the surface of the door. Use self-centering drilling bit to drill the screwholes and a driver to attach wood screws into these holes.
Shim the door against the cabinet and measure the small gap between the cabinet door and the cabinet surface. This distance is usually 1 ⁄16 inch (0.16 cm). Now make a vertical line on the cabinet 21/4 inch from the edge of the cabinet. To mark the top and bottom of the cabinet, take your gap height, and add 3.5 inches to it.
Measure this distance from the top and bottom of your cabinet and make a horizontal line for each mark. This line should intersect the vertical line you made before.
Separate the mounting plate from your hinge, place it on the intersection of the two lines you drew, and drill it into place. Use a self-centering drill to make screwholes and attach wooden screws inside. Do this for all the mounting plates.
Hold the door in the open position, bring it close to the cabinet, and align the hinge with the mounting place. Then slide the hinge onto the mounting plate with a click. Open and close the door to make sure the hinges work smoothly and are placed correctly.
You can easily install bottom molding on European style cabinets by choosing the right size and kind of molding, marking the area on the cabinet where you want it attached, and attaching the molding using a drill. Here is a video explaining the process.
You can install European hinges on face frame or simply framed cabinets using the method described above. All the measurements will remain the same as well.
Soft close hinges are installed the same way as all European hinges. The only difference is the type of hinge you’ll choose. Head over to our catalog for soft close hinges to choose the best one today. We also do hinge customizations.
You can install overlay cabinet hinges using the European hinge installation method. The tricky part is choosing the right size of cabinet hinge for your cabinets. To do this measure the overlay of your cabinet by subtracting the width of the cabinet opening from the width of the cabinet door and divide that number by 2.
Generally, cabinet doors that are 24 inches tall will need two hinges, each installed 5 inches from the top and bottom. Taller or thicker doors may need an additional middle hinge to give the door stability.
You can measure cabinet and wardrobe hinges using the length/width method or by measuring the cabinet overlay. Learn more about how to measure hinges here.
You can measure cabinet hinges the same way as door hinges. Here is a detailed blog on how to measure cabinet hinges.
While it may seem daunting at first, installing cabinet hinges isn’t that hard once you get the hang of it. Hopefully, this guide helped make the process of installing cabinet hinges easy for you. Take a look at our catalog of concealed cabinet hinges, corner hinges, and soft close cabinet hinges to get started on your next project.
If you are looking for drawer slides, we recommend that you check out our under-mount metal slides and telescopic extension slides.
RMGHardware is a professional cabinet hinge manufacturer who works closely with various well-known furniture brands, check out our blogs for tips and tricks around furniture hardware! Or contact us if you need help with sourcing hinges.